Slip Me Some Skin!!
The Final Layer
For the last layer, you apply the mache' to
larger areas at a time.
Start painting on the mixture good and thick and pressing the paper down firmly.
You can place a second dry piece of paper over the top to keep your hands
from sticking while your'e pressing the paper down. Make sure that all of
the mixture is covered with paper and that no bare mixture is showing. Any
loose ends of paper can be delt with later.
It can feel damp, but not sticky.
Design Note**
Any areas with bare mixture will not absorb the coffee color.
You can leave the teeth uncovered, or maybe a patch on one cheek or a patch
on part of the top of the skull making it look like bone is showing through
the rotted skin.
At this point, you can start applying your
coffee coloring.
Dip a clean paintbrush into the coffee and lightly touch the surface.
You can make it splotchy or try for a more even color.
You can let the paper wrinkle up for a nice withered look.
Let it dry in the oven for a few minutes
and dab on more coffee
until you get the look you want.

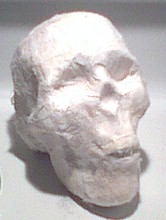
And Here She Is...
For outdoor use, be sure to seal your project
completely
with a few good coats of a clear, non glossy spray sealant.
Any Questions or Comments,